|
[an error occurred while processing this directive]
|
| How to Make a Federation Trooper Action Figure |
|
| Model and Instructions by Paul K. (Thanks Paul, it's
brilliant!!) |
|
| |
- Take a hollow, thin walled plastic sphere of 40mm in diameter
and cut it exactly in half.
- I used a large clear gobstopper packet, but a ping pong ball
would do.
- The edge where you cut it will be ragged and weak, so take a
strip of .5mm plasticard, 10mm wide and 100mm long (Length not
required to be specific, you can overlap and trim any excess!)
- Glue it around the circumference of your helmet with a 5mm clearance
hanging below the rim of the semi-sphere. (See FIG 1.) This will
strengthen the finished helmet a lot.
|
 |
 |
- The face plate is a simplified version of the 'real' helmet,
the convoluted moulding of which is a bit too hard to reproduce
at this scale.
- Some dextrous cutting is required to chop the piece of 1mm plasticard
into the pattern seen
in FIG 2.
|
- Once cut, sand all the edges smooth and gently use your own
body heat to tease the piece into a gentle curve.
- To give a better match to the TV prop, I cut an extra piece
(See FIG 2a) out of the .5mm card. This is identical to the lower
half of the face plate, but with an overhand of around 3mm.
- Once glued to the back of the face plate, an extra three-dimensional
look in acheived
- Now take this assembly and glue it to the inside of the reinforcing
strip attached to the helmet until the shaded area in FIG 2 is
concealed.
- The visor trim is 1.5mm platic coated electrical wire, and the
'respirator' section, a 13mm curved disc, is a screw cover from
a DIY kitchen unit!!
- With these elements in place, the whole thing can be sprayed
matt black and left overnight.
|
|
VISOR
|
|
| |
|
The visor is a piece of blank photographic negative,
doubled over to make it darker, and attached to the inside of the
face plate with double sided tape.
DO NOT USE superglue for this, as it fogs clear plastics!!
The visor divider is a small 3 x 10mm piece of the 1mm plasticard,
again stuck on with double sided tape
|

|
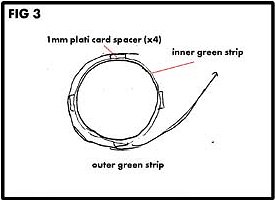
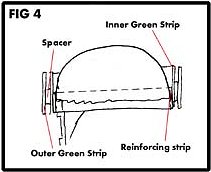
Now the hard part!!
- The green feature that circles the helmet is actually two strips,
one inside the other.
- I used a Canada Dry Ginger Ale bottle, as it already has a curve
moulded into it!
- Two strips, 15mm wide and 170mm long (Again, the length is approximate;
overlap and trim the excess.) This green plastic must be backed
with some non-yellowing 'invisible' cellotape to give it a translucant
look.
|
- The first strip is glued directly to the helmet reiforcing strip.
Then four roughly cut 'spacers' can be added (See FIG 3) at the compass
points, and the second strip added.
- A cross section of the helmet is provided in FIG 4, to try and illustrate
the various layers of the finished product.
Click here for Page 1: TOOLS / SKILLS / UNIFORM
Click here for Page 3: WEBBING / BLASTER / FINISHING
TOUCHES
|